Setting up Caddy on a VPS
I use Caddy on my VPS because:
- It’s simple to set up. No UI, just a config file.
- It’s perfectly happy to run in a Docker container. I try to run everything as a Docker container. Makes things super simple to set up and update.
- It automatically obtains SSL certificates from Let’s Encrypt. All the other popular open source reverse proxies do this too, nevertheless it’s a nice feature.
Docker Compose Setup#
-
Create a Docker network to make mapping applications easier (see the Caddyfile explanation below). You’ll want to use this same network in any application hosted in Docker containers that use Caddy.
docker network add caddy -
Create a folder. I like to keep all my Docker projects in a
dockerfolder.mkdir docker/comentario cd docker/comentario -
Create a
docker-compose.ymlfile.nano docker-compose.yml -
Paste in the compose config and save the file (CTRL-x, Y, ENTER).
services:
  caddy:
    image: caddy:latest
    container_name: caddy
    ports:
      - "80:80"
      - "443:443"
    networks:
      - caddy
    volumes:
      - ./conf:/etc/caddy
      - ./site:/srv
      - caddy_data:/data
      - caddy_config:/config

networks:
  caddy:
    external: true

volumes:
  caddy_data:
  caddy_config:
Caddyfile#
Caddy reads its configuration from a file called Caddyfile. In the compose config, we mapped the location to the conf folder via a volume mount. Now we need to create the file.
mkdir conf
nano Caddyfile
First, add an email address that will be passed to Let’s Encrypt. This is required for auto SSL certificates.
{
	email [email protected]
}
Next we need to add some mappings. Here’s the one you’ll likely use the most. A mapping from a URL (with subdomain) to a Docker container.
n8n.yourdomain.com {
	reverse_proxy http://n8n:5678
}
As you can see, the syntax is JSON-like but not actually JSON. I think they did this to make it easier for non-programmers to set up. As a programmer it’s confusing at first but you get used to it.
Here’s the other one you might use. Mapping a domain subfolder.
blog.yourdomain.com {
	handle_path /howto* {
		reverse_proxy http://howto-blog:80
	}

	handle_path /tech* {
		reverse_proxy http://tech-blog:80
	}

	handle {
		reverse_proxy http://blog-home:80
	}
}
Caddy can also act as a web server, like nginx. Not sure why anyone would want to use it for that, but it can do it so if you’re interested consult the official documentation.
Automatic SSL#
Caddy can automatically obtain SSL certificates from Let’s Encrypt via the HTTP-01 challenge. Here’s how it works:
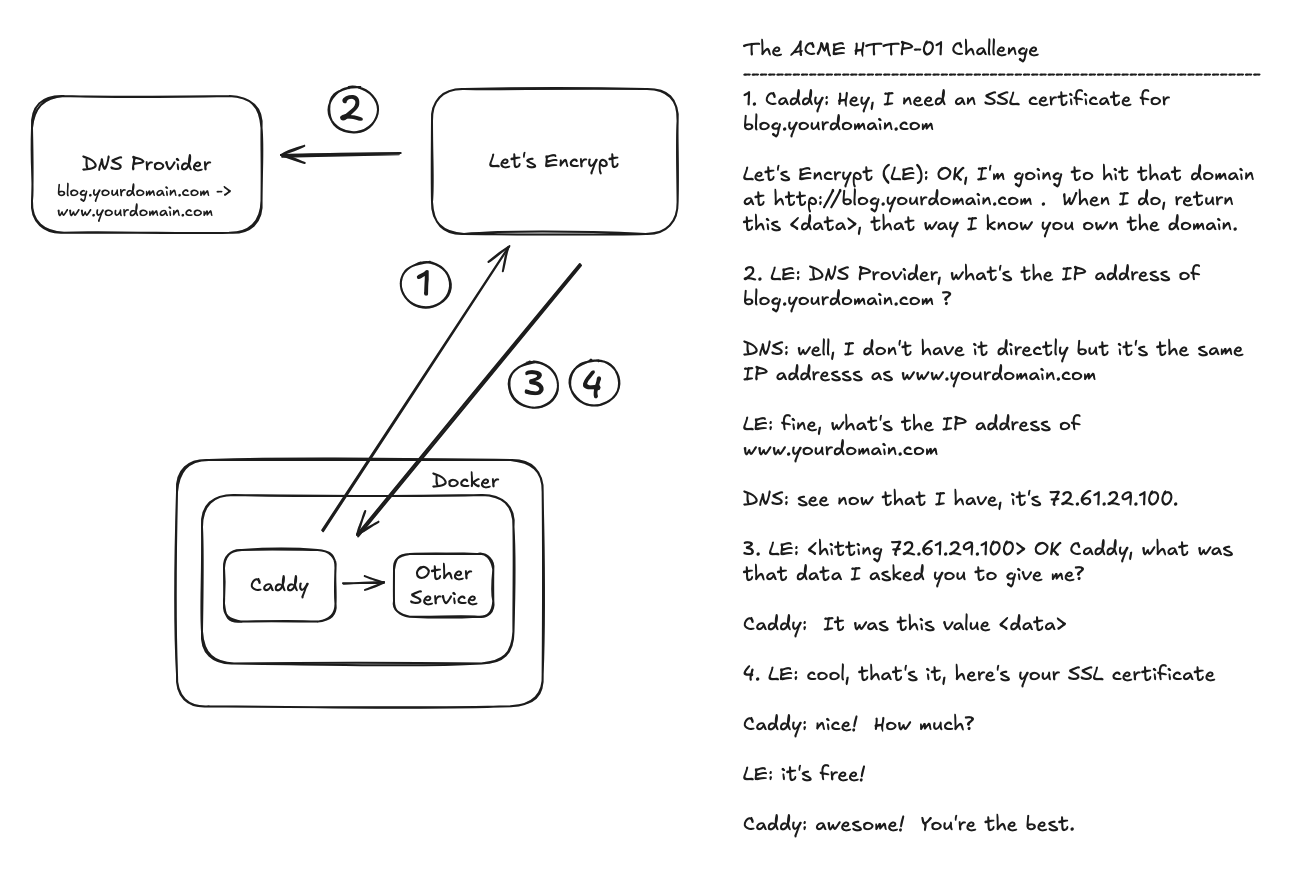
Just be sure to add your DNS CNAME or A record via your domain registrar before adding the entry to the Caddyfile. You’ll also want to allow some time for the DNS record to propagate. If you get a response from a ping (e.g., ping blog.yourdomain.com) you should be good to go.
What’s the difference between a CNAME and an A record? CNAME records maps domain name to domain name (e.g., blog.yourdomain.com -> www.yourdomain.com). “A” records map domain name to IP address (e.g., blog.yourdomain.com -> 72.61.29.100). Personally, I like CNAME records since it makes moving the domain to a different server easier. It is slightly slower though since anyone trying to resolve the domain name to an IP address requires two DNS lookups.
Updating the Caddyfile#
After editing your Caddyfile, you will need to get Caddy to reload it. Option 1 is to just restart the container. That will disrupt traffic on your server though, so it’s better to instruct Caddy in the container to reload the file.
docker compose exec -w /etc/caddy caddy caddy reload
Yeah, I know, there’s a lot of “caddy” in that command.
docker compose exec- executes a command within a container-w /etc/caddy- sets the working directory in the container. Think of it likecd /etc/caddycaddy- The name of the container that Caddy is running in. This is thecontainer_namein the compose file.caddy reload- The command to give in the container. This causes Caddy to reload it’s Caddyfile without breaking anything.
Conclusion#
That’s the basics of using Caddy on a VPS. When you have a new service, just add a CNAME record to DNS, add the Caddyfile entry, tell Caddy to reload it and you’re all set.