n8n Local Hosting with Cloudflare Tunnels - Long Version
Using Cloudflare Tunnels with self-hosted n8n offers a secure and hassle-free way to expose your automation workflows to the internet without opening ports or configuring firewalls. It eliminates the need for a static IP or dynamic DNS by creating an encrypted outbound connection from your server to Cloudflare’s edge network. This not only simplifies deployment but also adds a layer of protection against DDoS attacks and unauthorized access. With built-in TLS and fine-grained access controls, Cloudflare Tunnels make it easy to trigger n8n webhooks and integrations from anywhere while keeping your infrastructure locked down.
What you’ll need:
- A machine to host n8n. This can be a spare PC or even just an inexpensive Raspberry Pi (that’s what I used).
- A free Cloudflare account.
- A web domain that lives on Cloudflare’s nameservers. You can purchase a new one from Cloudflare or move a domain you already own to the Cloudflare nameservers.
The Setup:#
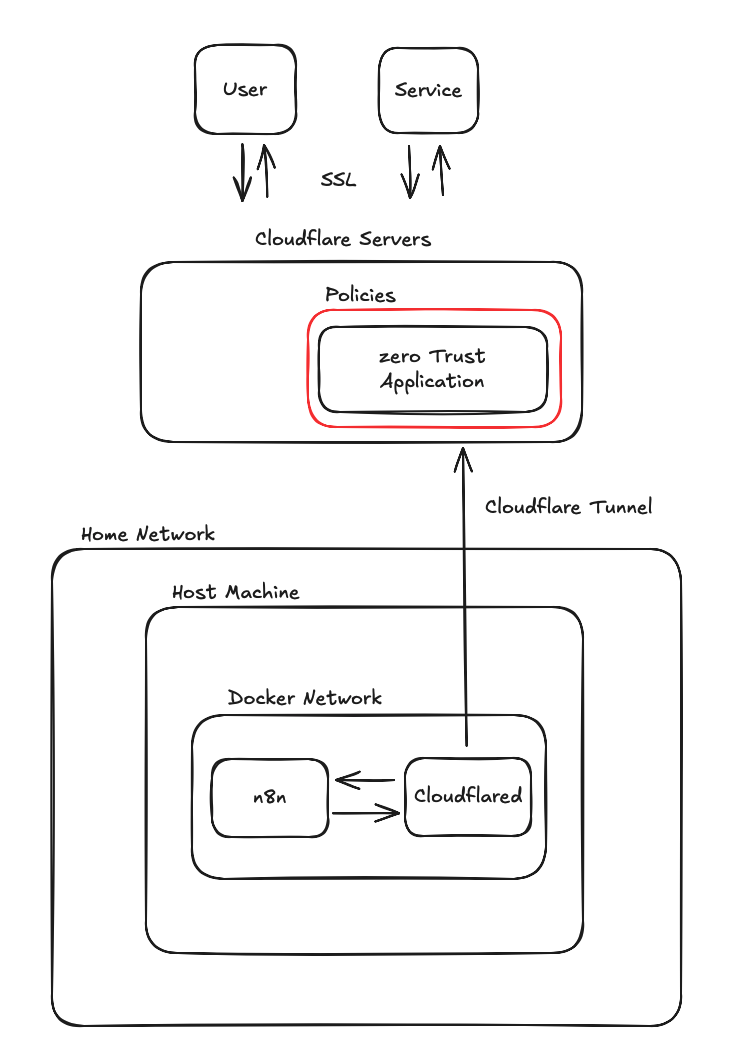
| Component | Description |
|---|---|
| User | You. Probably using the n8n editor to add or modify workflows. |
| Service | A service like Telegram that calls n8n to trigger workflows. |
| Cloudflare Servers | Servers that host the endpoint for your tunnel. Cloudflare handles SSL so you don’t need to obtain a certificate yourself. When users type your domain into a web browser, this is what they are hitting, not your machines directly. |
| Policies | Security policies to safeguard your tunnel. These policies determine which users and services are allowed to hit the tunnel. Cloudflare provides the login screen and a default login method via a one-time code sent via email. You can also configure an OAuth provider like Google if you’d like. |
| Zero Trust Application | An application defined in Cloudflare you can use to manage access to your tunnel. |
| Cloudflare Tunnel | The connection between the Cloudflared application running on your network and Cloudflare servers to shuttle traffic back and forth from your application. |
| Home Network | Your home network (basically, the network set up by your router). |
| Host Machine | The machine where you are running Docker as well as the n8n and Cloudflared Docker containers. |
| Docker Network | The isolated network that n8n and Cloudflared are running in. |
Step 1 - Install Docker:#
Here’s the official documentation on how to install Docker: https://docs.docker.com/engine/install/
I installed this on a Raspberry Pi and followed these instructions: https://pimylifeup.com/raspberry-pi-docker/ Note that n8n requires a 64-bit operating system so you’ll want to check your Raspberry Pi before proceeding using:
uname -m
aarch64means 64 bitarmv7l,armv6lmean 32 bit
Step 2 - Create the Docker Network:#
Create a new Docker bridge network that will be shared by Cloudflared, n8n, and any other container containing a service you want to expose via the Cloudflare Tunnel.
docker network create tunnel
We’ve named the network “tunnel” for clarity, but you can choose any name. If you use a different name, remember to adjust subsequent instructions.
This network provides isolation for your containers from the host and other Docker containers. It also simplifies setup by enabling containers within the network to resolve each other by name, eliminating the need for IP addresses or host port mapping.
Typically, you’d point the tunnel to an IP address like http://192.168.1.128:5678. However, by placing both the cloudflared and n8n containers on the same Docker network, you can refer to n8n by its service name. If your n8n service is named n8n in your Docker Compose file (as shown in Step 6), you can simply use http://n8n:5678 in the Cloudflare Tunnel configuration.
Step 3 - Create the Tunnel in Cloudflare:#
Cloudflare Tunnels are part of Cloudflare’s Zero Trust suite, letting you protect tunnels with access policies such as user login requirements and IP-based exceptions for services. Cloudflare also provides a guided setup wizard that walks you through creating the tunnel, adding the managing application, and configuring those access policies. To access this:
- Log into your Cloudflare account.
- Click on Zero Trust in the menu on the left side of the page. You’ll need to set up an organization the first time you do this. Just choose a name and proceed.
- Click the “Get started” tab at the top of the page.
- Click on the “Get started” button next to “Securely access private web apps without an agent”.
- Follow the steps which guides you through the process. When it asks you for a service route use
http://n8n:5678
If you want to set this up piece by piece, refer to this post.
If you plan on using webhook triggers, you will need to add an access policy to allow those to hit the n8n service. See this post for how to do that: [[n8n self-hosted + Cloudflare Tunnel + Telegram]] . Note that some triggers like Telegram use webhooks under the covers.
Step 4 - Create the Cloudflared Docker Compose File:#
To simplify the creation, starting, and stopping of your cloudflared container, we’ll use a Docker Compose file instead of direct docker run commands. This eliminates the need to remember complex command-line arguments.
- Create a directory to hold the compose file:
mkdir ~/tunnel-compose - Create the docker compose file:
nano ~/tunnel-compose/docker-compose.yml - Paste in the lines below.
- Enter Ctrl+x , type in “y” to confirm, press enter to accept the file name.
services:
  cloudflared:
    image: cloudflare/cloudflared:latest
    cap_drop:
      - ALL
    read_only: true
    security_opt:
      - no-new-privileges:true
    container_name: cloudflared
    restart: unless-stopped
    command: tunnel run
    environment:
      - TUNNEL_TOKEN=${TUNNEL_TOKEN}
    networks:
      - tunnel
networks:
  tunnel:
    external: true
Here’s a detailed breakdown of each line in your Docker Compose file:
| Line | Purpose |
|---|---|
services: |
Defines the start of the services section. Each service results in a docker container when the compose file is used with the “docker compose up” command. |
cloudflared: |
Name of the service. Other containers in the same Docker network can use this instead of IP address to access the service. |
image: cloudflare/cloudflared:latest |
Specifies the Docker image to use for the container. |
cap_drop: |
* Drops Linux capabilities for security hardening. |
- ALL |
* Drops all capabilities to minimize attack surface. |
read_only: true |
* Mounts the container filesystem as read-only. |
security_opt: |
* Applies additional security options. |
- no-new-privileges:true |
* Prevents the container from gaining new privileges (e.g., via setuid). |
container_name: cloudflared |
Sets a custom name for the container. This is what will show up in “docker ps” and other management tools like Docker Desktop or Portainer. |
restart: unless-stopped |
Automatically restarts the container unless manually stopped. |
command: tunnel run |
Runs the Cloudflare Tunnel application when the container starts. |
environment: |
Sets environment variables inside the container. |
- TUNNEL_TOKEN=${TUNNEL_TOKEN} |
Injects the tunnel token from your .env file. |
networks: |
Connects the service to one or more networks. |
- tunnel |
Specifies the network named tunnel. This is the Docker network shared with the n8n container. |
networks: |
Defines custom networks for the Compose file. |
tunnel: |
Declares the tunnel network. |
external: true |
Indicates the network is managed outside the compose file. |
| * - These lines are optional. They “harden” the container against attack but aren’t strictly necessary. |
Step 5 - Create the .env file for Cloudflared#
The Docker Compose file retrieves the ${TUNNEL_TOKEN} value from the .env file. You can find this token in the docker run command provided by Cloudflare during tunnel setup. Alternatively, navigate to “Tunnels” under the network section in the Cloudflare Zero Trust dashboard, select your tunnel, click the edit button, and then click the Docker button to reveal the docker run command containing the token.
- In the terminal, enter:
nano ~/tunnel-compose/.env - Paste in the lines below. Set the TUNNEL_TOKEN value equal to the token for your tunnel .
- Enter Ctrl+x , type in “y” to confirm, press enter to accept the file name.
- Note that the .env file is a hidden file. To list it in the directory use:
ls -a
.env file contents:
# Tunnel Token
TUNNEL_TOKEN=<YOUR TUNNEL TOKEN>
If you didn’t save the tunnel token when you set it up, you can retrieve it:
- Log into your Cloudflare account.
- Click Zero Trust in the side menu.
- Under Networks, click on Tunnels.
- Click the name of your tunnel and then the Edit button on the right side of the page.
- Click the Docker button in the middle of the page to show the “docker run” command. The tunnel token is at the end.
Step 6 - Create the Docker Compose file for n8n:#
- Create the docker volume for n8n:
docker volume create n8n_data - Create a directory to hold the compose file:
mkdir ~/n8n-compose - Create a directory for user files. This will allow n8n workflows to read and write files to the host file system.
mkdir ~/n8n-compose/local-files - Create the docker compose file:
nano ~/n8n-compose/docker-compose.yml - Paste in the lines below.
- Enter Ctrl+x , type in “y” to confirm, press enter to accept the file name.
services:
  n8n:
    image: docker.n8n.io/n8nio/n8n
    container_name: n8n
    restart: unless-stopped
    environment:
      - N8N_HOST=${SUBDOMAIN}.${DOMAIN_NAME}
      - N8N_PORT=5678
      - N8N_SECURE_COOKIE=false
      - N8N_PROXY_HOPS=1
      - N8N_RUNNERS_ENABLED=true
      - NODE_ENV=production
      - WEBHOOK_URL=https://${SUBDOMAIN}.${DOMAIN_NAME}/
      - GENERIC_TIMEZONE=${GENERIC_TIMEZONE}
      - TZ=${GENERIC_TIMEZONE}
    volumes:
      - n8n_data:/home/node/.n8n
      - ./local-files:/files
    networks:
      - tunnel
networks:
  tunnel:
    external: true
volumes:
  n8n_data:
Here is a line by line explanation of what we’re setting up.
| Line | Purpose |
|---|---|
services: |
Defines the start of the services section. Each service results in a docker container when the compose file is used with the “docker compose up” command. |
n8n: |
Name of the service. Other containers in the same Docker network can use this instead of IP address to access the service. n8n is accessed via the 5678 port so other containers in the network will access it via the http://n8n:5678 route. |
image: docker.n8n.io/n8nio/n8n |
The name of the Docker image for n8n |
container_name: n8n |
User defined value. This is the name that shows up for the container when you run “docker ps” or when you view the container list in Docker Desktop or Portainer. |
restart: unless-stopped |
Causes the Docker container to restart when Docker starts up unless it was manually stopped. |
N8N_HOST=${SUBDOMAIN}.${DOMAIN_NAME} |
The domain of the n8n service. Used to access the n8n editor via a web browser. |
N8N_PORT=5678 |
The port to expose for the service. 5678 is the default for n8n. |
N8N_SECURE_COOKIE=false |
Indicates the service is accessed by http and not https. This is needed because Cloudflared will be hitting the service without SSL. The user will still access the editor using https, but Cloudflare will be providing the SSL certificate. |
N8N_PROXY_HOPS=1 |
This is the number of reverse proxies between the user and the service. In this case it is 1 because the Cloudflare tunnel acts as a reverse proxy. |
N8N_RUNNERS_ENABLED=true |
Used to enable the use of task runners (used to offload some operations to prevent blocking the main n8n service). Setting this to false is deprecated so we’re adding this here for “future proofing” |
NODE_ENV=production |
Runs the service in production mode which optimizes performance. |
WEBHOOK_URL=https://${SUBDOMAIN}.${DOMAIN_NAME}/ |
The base URL for webhooks that can be used to trigger workflows. |
GENERIC_TIMEZONE=${GENERIC_TIMEZONE} |
The timezone to use with workflow schedule triggers. |
TZ=${GENERIC_TIMEZONE} |
Sets the system timezone to control what scripts and commands like date return. |
volumes: |
Section that defines the Docker volumes used by the container. |
n8n_data:/home/node/.n8n |
Maps the n8n_data docker volume to the container’s “/home/node/.n8n” folder. This is where workflow and credential data is saved. |
networks: |
Section that defines the Docker networks used by the container. |
tunnel |
The name of the Docker network shared with the Cloudflared container. |
external: true |
Indicates the network is managed outside the compose file. |
volumes: |
Section that defines the Docker volumes used by the container. |
n8n_data |
The name of the volume used to store n8n service configuration and workflow data. |
Step 7 - Create the .env file for n8n#
Values in the docker-compose.yml file defined with “${VARIABLE}” pull values from the .env file.
- In the terminal, enter:
nano ~/n8n-compose/.env - Paste in the lines below, changing the values to match your environment. The domain and subdomain names are those you set up when creating the Cloudflare application / tunnel.
- Enter Ctrl+x , type in “y” to confirm, press enter to accept the file name.
- Note that the .env file is a hidden file. To list it in the directory use:
ls -a
.env file contents:
# DOMAIN_NAME and SUBDOMAIN together determine where n8n will be reachable from
# The top level domain to serve from
DOMAIN_NAME=yourdomain.com

# The subdomain to serve from
SUBDOMAIN=n8n

# Optional timezone to set which gets used by Cron and other scheduling nodes
# New York is the default value if not set
GENERIC_TIMEZONE=America/Detroit
| Line | Purpose |
|---|---|
DOMAIN_NAME=yourdomain.com |
Domain defined in the Cloudflare Tunnel definition |
SUBDOMAIN=n8n |
The subdomain defined in the Cloudflare Tunnel definition |
GENERIC_TIMEZONE=America/Detroit |
The timezone to use in the service for schedule triggers |
Step 8 - Start the n8n container#
- In the terminal cd to the n8n compose directory:
cd ~/n8n-compose - Create and start the n8n container:
docker compose up -d - After the container is started, view the logs to look for any errors:
docker compose logs n8n
Step 9 - Start the Cloudflared container#
- In the terminal cd to the Cloudflared compose directory:
cd ~/tunnel-compose - Create and start the Cloudflared container:
docker compose up -d - After the container is started, view the logs to look for any errors:
docker compose logs cloudflared
Step 10 - Access the n8n editor#
In your browser, go to https://<subdomain.domain>. For example, if you set the tunnel up with subdomain = n8n and domain = example.com, visit https://n8n.example.com. You’ll land on the Cloudflare login page, and once you sign in, the n8n editor will appear. The first time you access it, you’ll be asked to create a username and password. And that’s it. You now have safe, authenticated access to your self-hosted n8n instance from anywhere on the public internet.