Using Caddy with Tailscale and Docker
Here’s the setup.
- You have one or more services running in Docker containers.
- The devices that need to access those services are part of a Tailscale network (Tailnet).
- You own a public domain name (e.g., your-domain.com)
- You want/need to serve those services via HTTPS
- You don’t want to open any ports or other holes in your firewall.
- You don’t want to mess with self-signed certificates or create your own private certificate authority.
If this is your situation, this post might help.
Automatically Obtaining SSL Certificates#
Most reverse proxies like Caddy provide a way to automatically obtain SSL certificates for subdomains of the public domain that you own. For instance, if you are self-hosting a service like
Immich
, an excellent good photo and video management application, you may want to access it via something like https://immich.lan.your-domain.com but not expose it to the public Internet. For internal networks like ours, Caddy does this through the ACME DNS Challenge method. Here’s what it looks like.
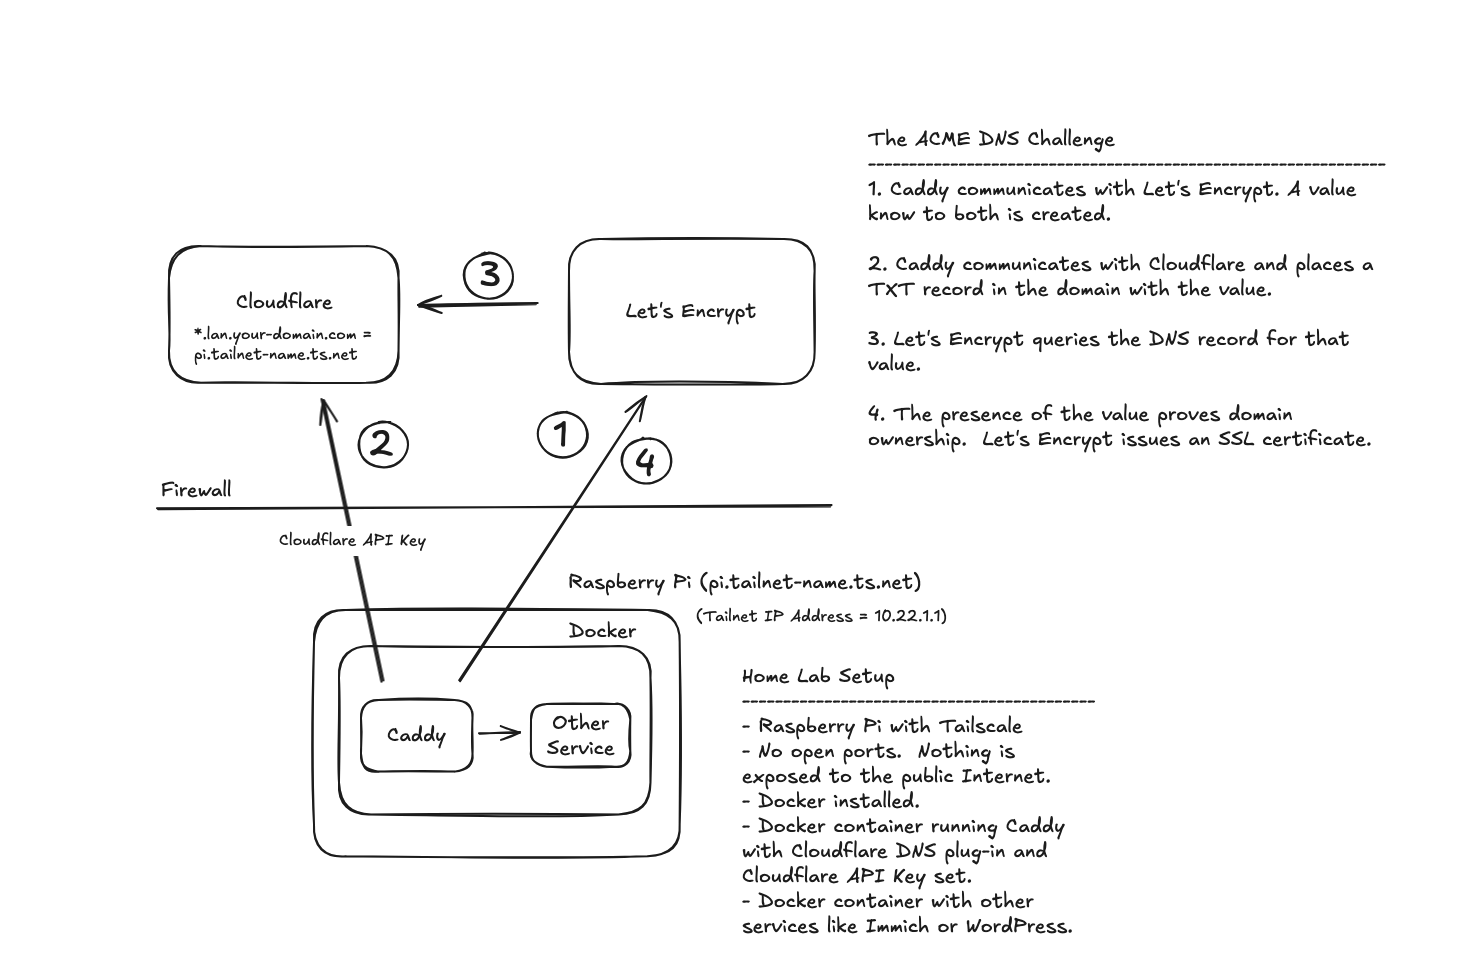
ACME DNS Challenge Setup#
You’ll need to do the following to set this up:
- Add a CNAME record in Cloudflare
- Generate an API key in Cloudflare
- Configure Caddy to use Cloudflare for SSL certificate generation
Add a CNAME Record#
The CNAME record we’re adding simply redirects whoever is asking for an IP address based on a fully qualified domain name (probably a web browser) to look up the address of some other machine to find the destination IP address. So in the example below, if we type in https://immich.lan.your-domain.com, the browser will ask Cloudflare what the IP address is. Cloudflare will tell the browser it needs to look up the IP address for pi.tailnet-name.ts.net instead. When the browser does that, your Tailnet’s MagicDNS service will intercept the request and provide the Tailnet IP address for the machine.
This is what we’re going for in Cloudflare:

-
Log into your Cloudflare account.
-
Click on the domain name you want to use for this.
-
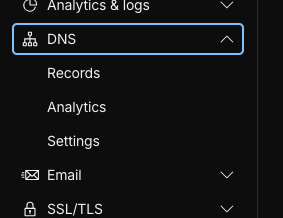
Click on Records under DNS in the menu on the left side of the page.
-
Click the Add Record button
-
Select CNAME from the Type dropdown
-
Enter a wildcard value for the subdomain. Using something like *.lan would allow you to generate multiple certificates like immich.lan.your-domain.com and wordpress.lan.your-domain.com, etc. without having to add additional CNAME records.
-
Enter the fully qualified Tailscale name for your local server. You can find this in your Tailscale admin panel’s Machines tab. It will be something like pi.tailnet-name.ts.net .
-
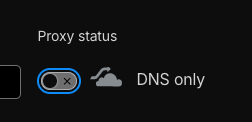
Switch “Proxy status” to “DNS only”
-
Click Save
Generate an API Key#
-
Click on “Account API tokens” under “Manage account” on the left side of the page.
-
Click the “Create Token” button.
-
Click the “Use template” button on the “Edit zone DNS” line.
-
The Account API tokens page will appear with a line with: Zone | DNS | Edit
-
Click the “+ Add more” line to add a new permissions line.
-
Enter: Zone | Zone | Read

-
Under Zone Resources, choose your domain in the last dropdown. You should end up with: Include | Specific zone | your-domain.com
-
Click “Continue to summary”
-
Click “Create Token”
-
Copy down the API key.
Configure Caddy#
You’ll need a Docker image of Caddy that includes the Cloudflare DNS plug-in. There is no “official” image in Docker Hub but there is a community maintained one. You can also build the image yourself if you’re feeling adventurous.
Docker Networking#
To make it easier to refer to the Docker containers, we’re going to add all of the containers, Caddy plus the other services, to the same Docker network. By doing so, we can refer to those services simply by the “service name” when setting up the reverse proxy addresses. First, create the new network.
docker network create caddy
We’ll then refer to this network in the docker-compose.yml file for Caddy and all of the services using it as a reverse proxy.
Create the Caddy Docker Compose File#
- Create a directory for the Docker Compose file and the Caddyfile.
mkdir caddy mkdir caddy/conf cd caddy - Create and edit a docker-compose.yml file
nano docker-compose.yml - Paste in this configuration
services:
  caddy:
    image: caddybuilds/caddy-cloudflare:latest
    container_name: caddy
    restart: unless-stopped
    ports:
      - "80:80"
      - "443:443"
      - "443:443/udp"
    volumes:
      - ./conf:/etc/caddy
      - ./site:/srv
      - caddy_data:/data
      - caddy_config:/config
    networks:
      - caddy
networks:
  caddy:
    external: true
volumes:
  caddy_data:
  caddy_config:
- Do the nano save file dance: CTRL+x, y, ENTER.
Create/Edit the Caddyfile#
- Edit the Caddyfile in the conf directory. This is the file that holds the reverse proxy address mappings.
nano ~/caddy/conf/Caddyfile - Add the Cloudflare TLS section at the top of the file.
(cloudflare) {
    tls {
        dns cloudflare <Paste Cloudflare API Key Here>
    }
}
- Configure a reverse proxy entry for each service you want to serve with https, importing the cloudflare section.
immich.lan.your-domain.com {
	reverse_proxy http://immich-server:2283
	import cloudflare
}

wordpress.lan.your-domain.com {
	reverse_proxy http://wordpress:80
	import cloudflare
}
- Do the nano save file dance: CTRL+x, y, ENTER.
Remember, we can refer to these services as immich-server:2283 and wordpress:80 instead of by IP addresses because we added those containers to the same Docker network as Caddy.
For example, here’s the whole docker-compose.yml file for immich (yep, it’s a big one). Notice the “networks” section under each service and the “networks” section for the whole compose process at the end.
#
# WARNING: To install Immich, follow our guide: https://docs.immich.app/install/docker-compose
#
# Make sure to use the docker-compose.yml of the current release:
#
# https://github.com/immich-app/immich/releases/latest/download/docker-compose.yml
#
# The compose file on main may not be compatible with the latest release.

name: immich

services:
  immich-server:
    container_name: immich_server
    image: ghcr.io/immich-app/immich-server:${IMMICH_VERSION:-release}
    # extends:
    #   file: hwaccel.transcoding.yml
    #   service: cpu # set to one of [nvenc, quicksync, rkmpp, vaapi, vaapi-wsl] for accelerated transcoding
    volumes:
      # Do not edit the next line. If you want to change the media storage location on your system, edit the value of UPLOAD_LOCATION in the .env file
      - ${UPLOAD_LOCATION}:/data
      - /etc/localtime:/etc/localtime:ro
    env_file:
      - .env
    ports:
      - '2283:2283'
    networks:
      - caddy
    depends_on:
      - redis
      - database
    restart: always
    healthcheck:
      disable: false

  immich-machine-learning:
    container_name: immich_machine_learning
    # For hardware acceleration, add one of -[armnn, cuda, rocm, openvino, rknn] to the image tag.
    # Example tag: ${IMMICH_VERSION:-release}-cuda
    image: ghcr.io/immich-app/immich-machine-learning:${IMMICH_VERSION:-release}
    # extends: # uncomment this section for hardware acceleration - see https://docs.immich.app/features/ml-hardware-acceleration
    #   file: hwaccel.ml.yml
    #   service: cpu # set to one of [armnn, cuda, rocm, openvino, openvino-wsl, rknn] for accelerated inference - use the `-wsl` version for WSL2 where applicable
    volumes:
      - model-cache:/cache
    env_file:
      - .env
    networks:
      - caddy
    restart: always
    healthcheck:
      disable: false

  redis:
    container_name: immich_redis
    image: docker.io/valkey/valkey:8@sha256:81db6d39e1bba3b3ff32bd3a1b19a6d69690f94a3954ec131277b9a26b95b3aa
    healthcheck:
      test: redis-cli ping || exit 1
    networks:
      - caddy
    restart: always

  database:
    container_name: immich_postgres
    image: ghcr.io/immich-app/postgres:14-vectorchord0.4.3-pgvectors0.2.0@sha256:bcf63357191b76a916ae5eb93464d65c07511da41e3bf7a8416db519b40b1c23
    environment:
      POSTGRES_PASSWORD: ${DB_PASSWORD}
      POSTGRES_USER: ${DB_USERNAME}
      POSTGRES_DB: ${DB_DATABASE_NAME}
      POSTGRES_INITDB_ARGS: '--data-checksums'
      # Uncomment the DB_STORAGE_TYPE: 'HDD' var if your database isn't stored on SSDs
      # DB_STORAGE_TYPE: 'HDD'
    volumes:
      # Do not edit the next line. If you want to change the database storage location on your system, edit the value of DB_DATA_LOCATION in the .env file
      - ${DB_DATA_LOCATION}:/var/lib/postgresql/data
    shm_size: 128mb
    networks:
      - caddy
    restart: always

volumes:
  model-cache:

networks:
  caddy:
    external: true
Start the Caddy Contiainer#
To start the Caddy container run:
docker compose up -d
Caddy will negotiate with Let’s Encrypt for each entry in the Caddyfile that it doesn’t already have a certificate for. You’ll want to give it a couple of minutes before trying to access the sites to let that process finish. After that, just enter the address for your service, e.g., https://immich.lan.your-domain.com , in a browser window. It should show up without any “Insecure” warnings.