SSH via Tailscale on a VPS
After signing up for a new VPS service on Hostinger I went about trying to “harden” the server. This involved the minimal steps of setting up SSH keys on my local machines and uploading the public keys to the server so I could SSH into it. I then removed the ability to SSH via password. While this did what was intended, keeping anyone other than me from SSH’ing into it, it didn’t stop the nearly constant attempts by bots to log into the machine. So with that in mind, I decided to add some more defensive layers. Here’s what I did.
Install Tailscale#
The subsequent steps below will close port 22 on the VPS. That prevents normal SSH into the server, however, I still want to be able to access the server from my laptop to perform admin tasks. Luckily, Tailscale provides a solution by giving you the ability to SSH via your Tailnet even if port 22 is closed via firewall.
- SSH into the server.
- Install Tailscale on the VPS.
- Advertise SSH on the VPS
sudo tailscale set --ssh
- Log out of the SSH session.
exit
Next, let’s create a tag to make it easier to assign permissions when dealing with the server.
- On the Tailscale admin page, click “Access controls”.
- Select “Visual editor” in the “Access controls” section of the page if it isn’t already selected.
- Click the Tags tab.
- Click “+ Create tag”.
- Enter a Tag name. I used “vps”.
- Select a tag owner. I selected my email address.
- Enter any notes you would like.
Apply the tag to the machine.
- On the Machines tab of the Tailscale admin page, locate the VPS.
- Click the “…” context menu and choose “Edit ACL tags”.
- Select the “tag:vps” tag from the “Add tags” dropdown.
- Click Save.
Since the machine is now owned by the “vps” tag and not you anymore we’ll need to explicitly give ourselves rights to SSH into the machine.
- On the Tailscale admin page, click “Access controls”.
- Select “Visual editor” in the “Access controls” section of the page if it isn’t already selected.
- Click the “Tailscale SSH” tab.
- Click “Add rule”.
- Select a Source. This can either be your specific user or the “autogroup:admin” group (that’s what I used).
- Select “tag:vps” as the Destination.
- Enter the vps user you will log in as in the “As destination user” box. The interface is a little wonky. I had to type in the user name and then click out of the box. This adds what I typed in to the dropdown list. I clicked back into the box and selected the user name from the dropdown list.
- Select “On” for “Check mode”. This is optional but recommended. It forces you to log in using your Tailscale credentials when using SSH.
- Click “Save SSH rule”.
SSH into the server via Tailscale.
- On the Machines tab of your Tailscale admin page, located the VPS and note the name of it (you can change the name to whatever you want via the “Edit machine name…” context menu).
- SSH via Tailscale.
ssh username@tailscale-machine-name
You should be prompted to log into Tailscale.
Close Port 22 via the Hostinger Firewall#
Port 22 is the port on the machine used for SSH (unless you explicitly change it). Closing it via the Hostinger firewall is the most effective protection. This will prevent attack bot traffic from even hitting your server.
- Log into Hostinger and navigate to the admin panel for your VPS.
- On the side menu, expand “Security” and choose “Firewall”.
- If the list is empty click “+ Add firewall”.
- If you aren’t hosting any websites on this machine that’s all you need. The default “Drop” rule will keep any incoming traffic from hitting your server.
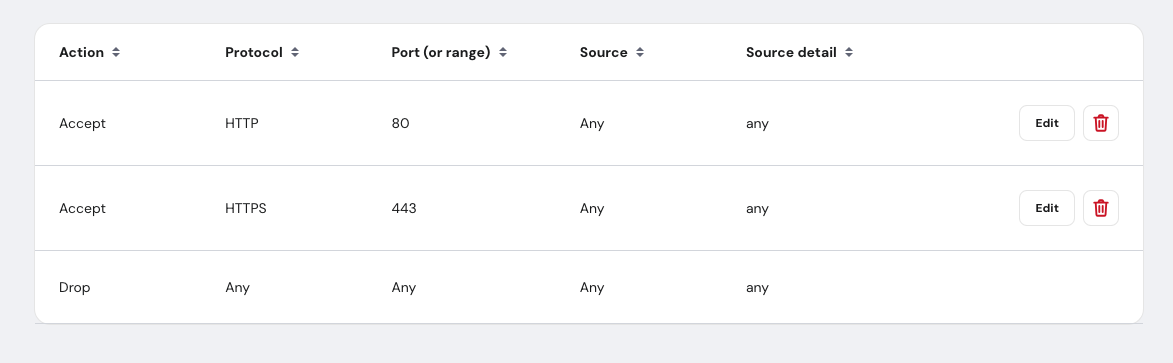
- If you are hosting web sites, you’ll need to allow traffic in on port 80/HTTP and 443/HTTPS.
Close Port 22 via UFW#
UFW (Uncomplicated Firewall) is typically installed by default. Technically you don’t need to close port 22 on the server since the Hostinger firewall will block that traffic before it gets to you but it doesn’t hurt and adds another layer of defense.
- SSH into the machine via Tailscale.
- Add the rule to close port 22.
sudo ufw deny 22/tcp
sudo ufw reload
sudo ufw status
- It should now show the DENY rule for port 22.
In Case of Emergency#
If for whatever reason you need to access the VPS on a machine not connected to your Tailnet you can do it via the Hostinger admin panel. This method is equivalent to accessing it by plugging a keyboard and monitor into a physical machine, so it will always be available.
- Log into Hostinger and navigate to the admin panel for your VPS.
- Click the “Terminal” button in the upper right corner.

- Log into the VPS